Flashing a clone BLE with original firmware
Because the clone BLE uses the same SoC (n51802) as the stock BLE, we can actually flash the stock firmware to this clone chip. Why the manufacturers of these clones don't do this by default is beyond me. In these instructions I'll use and ST-link to flash the firmware but a J-link should work fine as well.
Original firmware
The original firmware consists of a base "softdevice" for the nrf51. We'll use S110. On top of that you'll need to flash the original bootloader followed by the actual firmware:
Requirements
- A blue clone BLE board (haven't tried this on the purple boards yet)
- ST-link or J-link
- Some soldering skills
- 1.5mm pin headers & jumper wires
Instructions
Connect the board to the ST-link
Start by removing C16. Some people say you should remove the R1 "reset resistor" as well, other say you don't. I've removed it to be sure - you can always solder a resistor in place later.
Next up, solder some pin headers on the BLE's SWD points as shown below.
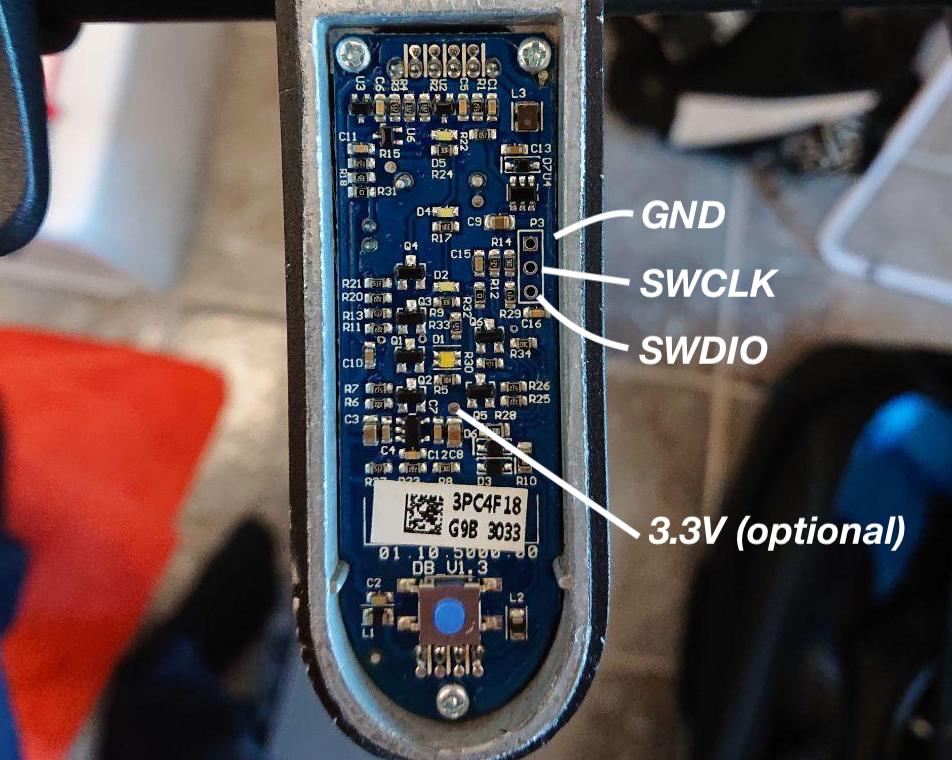
If you've got the original round 4-pin connector you're done soldering now. You can connect a female jumper cable to the to top-left pin in the round connector as shown below.
If you don't have an easy way to connect to the 5V connection, your best bet is to solder a pin to the pad above C7 marked as 3.3V on the image above.
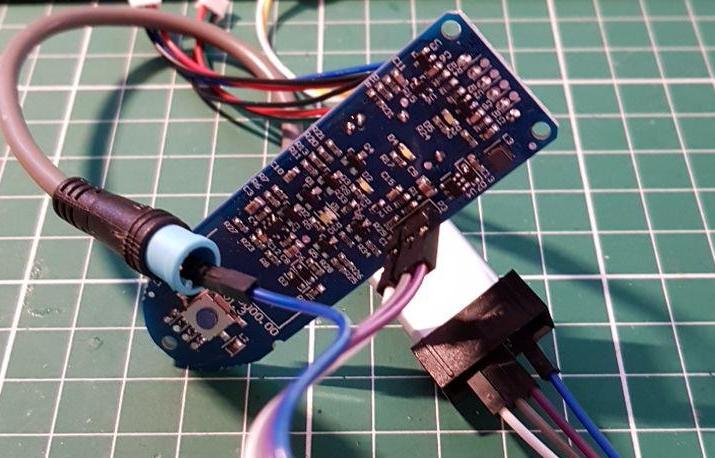
Finally plug everything in as shown below. Use the 3.3V point only if you can't easily access the 5V in the connector.
Install and download the required software
Before connecting the ST-link to your Windows/Linux machine, download the drivers here. Scroll all the way down to down to "get software" and download "STSW-LINK009".
After installing the ST-link drivers, we'll need OpenOCD. OpenOCD is an amazing free tool we'll use to talk to the BLE through the ST-link. Download the pre-built binaries here. I've used vesion 20190210. Extract these files somewhere and download the ST-link + nRF51 configuration file for OpenOCD. You can place it inside of the openocd/bin/ directory.
Obviously, you'll also need the actual firmware files. Download them at the top of this page and put them in openocd/bin/ as well.
You'll also need Telnet to connect to OpenOCD. Follow the steps here to enable and install Telnet on Windows 10.
Finally we'll be using a terminal to execute commands and connect to the BLE. Window's default command prompt will do but I prefer to use Hyper as it's not 1998.
Connect to the n51802 using OpenOCD
Finally it's time to connect your ST-link and BLE to your machine! Your BLE will turn on and Windows will take a minute to install drivers.
Open the terminal and navigate to the openocd/bin/ directory. Execute the following command to start OpenOCD and connect to the ST-link:
openocd -f stlink_nrf51.cfg
The output should look something like this:
Open On-Chip Debugger 0.9.0 (2019-02-10)
[...]
Info : STLINK V2J17S4 (API V2) VID:PID 0483:3748
Info : Target voltage: 3.237541
Info : nrf51.cpu: hardware has 4 breakpoints, 2 watchpoints
Leave OpenOCD running and open a new terminal session. We can connect to OpenOCD using the following command:
telnet 127.0.0.1 4444
If all goes well you should be greeted with the Open On-Chip Debugger text. Try entering the reset halt commands to make sure everything is working as expected.
Open On-Chip Debugger
> reset halt
target halted due to debug-request, current mode: Thread
xPSR: 0xc1000000 pc: 0x000006d0 msp: 0x000007c0
> mdw 0x4
0x00000004: 00000000
You are now ready to flash the firmware.
Flashing the firmware
Once you're connected to OpenOCD using telnet we can execute the following commands to reset the BLE, completely erase its memory and then flash the 3 hex files:
reset halt
nrf51 mass_erase
program s110.hex verify
program blebootloader.hex verify
program blefirmware.hex verify reset
You can read more about these commands here: http://openocd.org/doc/html/Flash-Commands.html.
After the last program command the BLE will restart itself. It's now safe to disconnect it from the ST-link and try it out on your M365!